Stefan’s Volksplane Construction Log
My Workshop
October 21, 2011

My small-hobbies workshop.
2004-Jun to 2006-Feb: When I first set out to build my own airplane, my workshop space was rather limited. I had one 10′ x 17′ room with two workbenches in it: a 9′ x 2′ bench in an alcove for my electronic projects, and a 2-1/2′ x 6-1/2′ walk-around bench for my model airplanes. Not wanting to delay my Volksplane project to build a better workshop, I decided that this would do for a while. There would be plenty of space to build the rudder and stabilator before having to expand.

Our basement mudroom was pressed into service as a building area.
The one problem with this space was that there was no room to put the various power tools I was to acquire. Although I had my drill press and scroll saw in that workshop, there was no way to fit in the router table, bandsaw, benchtop sander, and grinder that I felt I needed. Fortunately, there was another 10′ x 14′ room in the basement that was being used only as a mudroom when heading to or from the barn.
I built some benches around the perimeter of this room and mounted the tools to these. This gave me plenty of space to use the tools as well as giving me a place to do work that required open floor space. Of course, this room was still being used as a mudroom, so it had to be kept reasonably clear.

The new space is about 27′ by 13′.
2006-Mar to 2006-Jul: After I completed the rudder and stabilator and began working on the fuselage bulkheads, I decided I was going to need more space to assemble the fuselage and later the wings. At that point my wife graciously offered me the use of about two-thirds of the rest of the basement. So, we moved some walls around, giving me a combined workshop area of about 600 square feet.
We painted the floor and put white painted panels on the wall. With the three windows, it’s bright enough to leave the lights off on a sunny day.
I took advantage of a soffit enclosing some ductwork to build a plywood storage area (left side of photo above), a rack for the long pieces of aircraft spruce that I’d be using (top left corner of photo), and a wall-mounted bench on which to install my drill press and work on smaller components.
The next order of business was to construct some work benches for the new space. I knew I’d be needing a 2′ x 16′ bench on which to build the fuselage. The Volksplane plans show a temporary fuselage construction table made of two 2′ x 8′ plywood pieces, four 9′ 2x4s, and a pair of sawhorses.
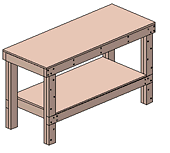 However, I wanted benches that could be used for other purposes too, so I set out to design something more versatile and permanent. The solution I settled on was based on the 5′ x 2′ EAA Chapter 1000 Standardized Work Table. Instead of building three of these 5′ tables (which would only give me 15′), I decided to build one 4′ table, one 6′ table, and a 6′ bridge. In addition to giving me two different sized workbenches for later use, this choice of sizes also let me cut all the tabletops from a single 4′ x 8′ sheet of 3/4″ G1S plywood.
Because of the longer span of the 6′ table and bridge, I chose to use 2×6 lumber instead of 2×4 for the tabletop perimeter framing. I also made the tables 2″ lower than shown on the plans. I won’t go into all the details of assembling the tables, since it’s very well described in the Chapter 1000 plans. Here are some photos taken during construction:

First the frame is assembled on the floor. |

Next the top is screwed to the frame. |

The legs are added next, then the lower shelf framing. |

Two tables with lower shelf installed, and the bridge. |
The bridge is built in exactly the same way as the two table tops. There just aren’t any legs.

Workbench sections joined by 3/8" bolts.
To install the bridge, I lined up the two tables and screwed some support blocks to the legs. My wife and I then lowered the bridge into place. I used various scraps to shim up the bridge so that the surfaces lined up and temporarily clamped the bridge to the tables. I drilled a pair of 3/8″ holes through the bridge and table ends, and used 4″ x 3/8″ carriage bolts, washers, and nuts to hold things together semi-permanently.

The completed 16′ by 2′ workbench.
Here’s a view of the completed bench and a good portion of the entire shop. After the bench was assembled, it took me quite a while to make it flat and level. Although I made all the legs exactly the same length, the floor is warped because of a drain in one corner. Levelling the benches required progressively thicker shims as I approached the corner. In the end though, the top ended up absolutely flat.
Also visible in this picture are various benchtop power tools. Most of these (except the drill press and bandsaw) have been mounted on movable carts with built-in storage. The carts have double-locking swivel casters so they can easily be moved about if needed but will stay in place when being used. Most of the carts were made from discarded furniture (night tables, a dresser, and wooden filing cabinets). The non-movable bandsaw bench is an old desk.

Completed workshop, looking south.
Here’s another view, showing the wall-mounted bench and peg board. The rack for long pieces of aircraft lumber is also clearly visible. Lighting is provided by a collection of left-over fixtures each holding multiple 23W compact fluorescent lightbulbs (100W incandescent equivalent). The french doors lead into the finished part of the basement, letting it benefit from the natural light in the workshop.

The finished parts will fit through the door at the north end.
The basement has a door to an outside stairway which will make it easy to get completed parts (specifically the fuselage and wings) outside after assembly. Racks on the wall at the left side of the photo hold the completed stabilator and rudder, and nearly completed fuselage bulkheads. You can see from the jackets hanging on the wall by the door that this room is still being used as a mudroom too.

To the right of the cables on the ceiling used to be the mudroom.
This photo is interesting because it was taken from almost the same spot and at the same angle as the second photo on this page. The wires running along the ceiling show where the wall used to be, making it clear how much of an improvement this renovation has been. To the left of the bandsaw is a cart that I constructed to hold off-cuts. The top part holds longer pieces, and the bottom (not visible) has a bin to hold smaller pieces. The racks for completed parts (and wing struts at the top left) are also clearly visible here.

View from the finished part of the basement.
Finally, here’s a view from the finished part of the basement into the workshop. This room has become home to a Yamaha Electone organ I’ve had since I was twelve. I intend to start playing it again someday but I’m not very musically talented and currently have no time to practice (building a plane has that effect). We had a builder put up the walls and hang the doors, but I did the floor and trim myself.
Now, back to work on the plane!
2011-Oct-21 Update: Since the photo above was taken, we did a renovation upstairs (in 2007), which removed the window behind me. I purchased a 1962 Hammond tube-and-tonewheel organ which is now in our library, and the Yamaha has been dismantled and used for parts (you can’t even give these transistor organs away these days). This basement room has been repurposed as a home gym.
![]()
![]()
![]()
![]()
![]()
![]()
![]()
![]()
![]()
![]()
Disclaimer: Although every effort has been made to ensure accuracy and reliability, the information on this web page is presented without warranty of any kind, and Stefan Vorkoetter assumes no liability for direct or consequential damages caused by its use. It is up to you, the reader, to determine the suitability of, and assume responsibility for, the use of this information. Links to Amazon.com merchandise are provided in association with Amazon.com. Links to eBay searches are provided in association with the eBay partner network.
Copyright: All materials on this web site, including the text, images, and mark-up, are Copyright © 2026 by Stefan Vorkoetter unless otherwise noted. All rights reserved. Unauthorized duplication prohibited. You may link to this site or pages within it, but you may not link directly to images on this site, and you may not copy any material from this site to another web site or other publication without express written permission. You may make copies for your own personal use.
Jack Sky
October 09, 2010
^_^ i like it
Gene Hall
January 03, 2011
looks as though you have what you wanted. You incorporated some good ideas, Good luck on your buildin the vp, I have had plans for probaly io or 12 years for vp. Hope soon to start on it. Keep on building, Gene Hall Britt Ia
ian and son
July 03, 2016
Hello Stefan,
just found your site. We live in Swaziland, and my son Angus and I are considering building a VP-1. Will keep an eye on developments, cheers, Ian
and Angus.
Nice workshop too.(writes Angus, aged 12)
ian and son
July 03, 2016
By the way, we used to live in Bellrock some 5 years ago, and went to the RC field in the cedar forest…