Always Ready to Fly
October 1, 2003 for QuietFlyer Magazine
Last month, we looked at ways to upgrade almost-ready-to-fly (ARF) models to get better performance. This month, we’ll look at a different idea that also has the acronym ARF: Always-Ready-to-Fly. Coincidentally, the model used is the SL Model Tiny ARF we upgraded last month, and we’ll make a few more changes to it so we can keep it in a ready-to-fly state. We’ll also look at how to keep a power battery ready to fly.
Lose the Rubber Bands
Many small planes use rubber bands to hold the wings on. If you don’t mind having to put the wings on before going flying, this is okay, but personally, I like to pick up the plane, the radio, and the battery, and fly now! I find that putting a rubber-banded wing on straight can be frustrating if I’m in a hurry.
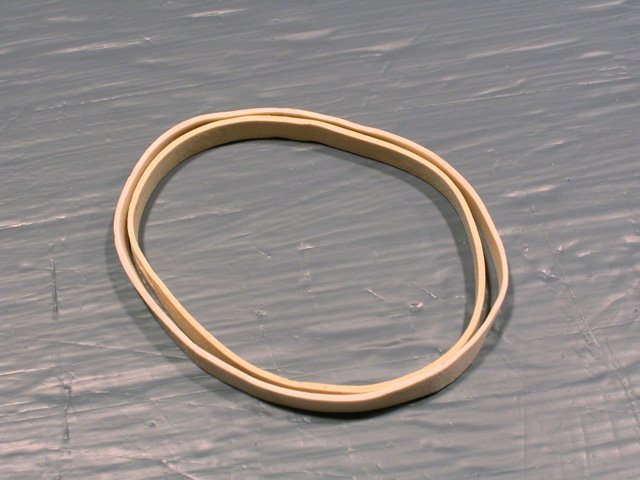
Leaving the wing rubber-banded on all the time is not wise. The photo shows a pair of formerly identical rubber bands, one of which has been holding a wing on for a month. It is significantly longer.
Therefore, all my planes eventually end up with bolt-on wings. A side benefit is that it improves performance very slightly (less drag), and looks better. It can also make flights more consistent; with my Gentle Lady sailplane, I eventually discovered that the flying characteristics would change depending on which end (front or back) of the wing was held more tightly to the fuselage, since this affected the wing incidence.
I recently modified my SL Model Tiny ARF to have a bolt-on wing. The details of this modification will be different for every plane, so just use this as an example.

Some pieces of 1/8" hard balsa reinforce the wing hold-down area. |
. The holes and notch are for the receiver antenna and access to the servo screws.")
The wing hold-down plate is made from 1/8" birch plywood (not lite-ply). The holes and notch are for the receiver antenna and access to the servo screws. |
I first glued a pair of 1"x1/8"x3/8" hard balsa pieces to the wing saddle doublers under the trailing edge, and then made a 1/8" birch plywood (not lite-ply) plate to receive a pair of wing bolts. I glued the plate under the balsa pieces, and also under the upper part of the trailing edge fuselage former.

The plate is installed between the wing saddle doublers, under the reinforcements and rear upper former. |

The forward wing hold-down hook is made from 1/8" birch ply, and is epoxied into a slot cut in the wing. |
Next, I made up a piece of 1/8" birch plywood to fit into the front underside of the wing at the center section joint. A notch in the front of this piece fits over the existing forward rubber-band dowel. Although the entire piece is not visible in photo 6, it extends into the wing about 1/2" at the front (just behind the leading edge stock), and 3/4" at the rear (about 1.5" back from the leading edge). I cut a 1/8" slot into the wing undersurface, dug the foam out of the slot, and epoxied this piece in place. I put the wing on the model, and rubber-banded it in place so the epoxy would set with the notched plate in exactly the right position.

The wing hold-down hook engages the existing front rubber-band dowel. |

Drill the rear wing hold-down bolt holes perpendicular to the wing’s upper surface. |
To the rear wing hold-down plate, I glued a piece of very light and soft 1/4" balsa, on top of which I glued a piece of 1/16" plywood. This is there so that the wing bolts will not pass through 5/16" of air between the bottom of the wing and the top of the read hold-down plate (otherwise they could flex, and also would fail to snap in the event of a crash). I rubber-banded the wing in place one last time, and then drilled 5/32" bolt holes through it and the wing hold-down plate, being careful to remain perpendicular to the upper surface.

A 1/4" light balsa block with a 1/16" ply face guides the bolts down to the wing hold-down plate. |

In this "x-ray" view, the placement of the wing hold-down bolts is clearly visible. |
I then removed the wings, enlarged the holes in the wing to clear a 10-32 bolt, and tapped the holes in the hold-down plate with a 10-32 tap (normally I would use 8-32 bolts for a plane of this size, but I didn’t have any long enough to reach the hold-down plates, so I used 10-32 instead). Finally, I carefully sawed off the protruding rubber-band dowels. The result is a wing that can be left on all the time, and looks neat.

Here’s the finished job. The wing can now be left on the plane all the time, and it looks sleeker too.
Batteries
As electric modelers, we don’t have to worry about keeping a can of fuel and the necessary starting equipment handy for flying on short notice. On the other hand, the plane needs a charged battery to fly, and like the glow modeler, we need to keep the transmitter (and possibly receiver) batteries topped up.
Whether a battery pack consists of Nickel-Cadmium (NiCd), Nickel-Metal-Hydride (NiMH), or the new Lithium Polymer (LiPoly) cells, keeping it connected to charger at all times is not a good idea.
A peak charger (or the appropriate charger for LiPoly) batteries won’t do anything to keep a pack charged, since these kinds of chargers shut off once a charge is completed. The problem is that all types of batteries lose their charge over time (the LiPolys more slowly), and need to be periodically recharged.
A NiCd or NiMH slow charger (often called a C/10 charger, because it charges at a milliAmp rate equal to 1/10th the milliAmp-hour rating of the battery) can be left connected to a battery for at most a few days without doing damage to the cells. And for LiPoly batteries, there is no such thing as a slow charger.
The NiCd/NiMH Solution
NiCd and NiMH batteries can be left connected to a trickle charger, which usually charges at about a C/100 rate (for example, 30mA would be appropriate for a 3000mAh battery). However, experience suggests that the continuous flow of even such a tiny current will degrade the cells.

In order to be able to fly at a moment’s notice, you’ll need a battery that’s always charged. A slow charger and a timer make this possible.
The solution is to revert to using a slow charger, but only for a very short amount of time each day. The easiest way to do that is to plug the slow charger into a plug-in timer, and set it to turn on for about half an hour per day.
Left alone, a NiCd or NiMH battery loses about 1% of its charge per day. For example, a 3000mAh battery will lose about 30mAh of charge. This is the amount of charge that a C/10 charger will theoretically put back in 0.1 hours, or six minutes (C/10 is 300mA for this battery, and 300mA times 0.1 hours is 30mAh). Because of charging inefficiencies, it will really take about ten minutes. Furthermore, many C/10 chargers aren’t very well regulated, and will charge a nearly-full pack at somewhat less than the C/10 rate. By charging for half an hour, you are sure to get the 30mAh you need, yet aren’t charging for long enough to heat up the cells and damage them.
Where do you get a slow charger for your battery pack? The easiest way is to make one out of an AC adapter (commonly known as a "wall-wart"). Choose an adapter that is rated about 1.4 times the pack voltage (for example, 12V for an 8.4V pack) at about the C/10 rate (300mA for a 3000mAh pack). Make sure the adapter produces DC, not AC! Choose one that is not regulated (if it doesn’t say on it that it’s regulated, it isn’t).
I used to compute the value of the appropriate resistor to wire in series between the adapter and the battery being charged to get the right charge current, but have found that the internal resistance of most adapters rated as described above results in the right charge rate when connected directly to the pack.
Cut the equipment plug from the end of the adapter’s cable, and use a voltmeter to determine the polarity of the leads. Then install the appropriate connectors to match those on your battery pack. Double check that you got the polarity right.
Fully charge the battery pack using your regular peak charger, and let it sit overnight. The next day, connect it to the trickle charger through an ammeter (the Astroflight Whattmeter makes this easy, since you can just plug it in between the adapter and the pack), plug the adapter into the wall, and verify that the current is approximately at the C/10 rate (it doesn’t have to be exactly right, plus or minus 30% is fine). If the current is too low, you’ll need to try a different adapter (with a slightly higher voltage or a higher current rating).
If the current is too high, you can reduce it with a resistor, starting with the following formula:
R = 10,000 x (Vn – 1.1 x Vp) / C
where Vn is the adapter voltage when nothing is connected to it, Vp is the rated battery pack voltage, and C is the pack capacity in mAh. For example, with a 12V adapter and an 8.4V 3000mAh pack, the appropriate resistor to use would be 10,000 x (12 – 1.1 x 8.4) / 3000 = 9.2 Ohms. The resulting current will likely be too low due to the internal resistance of the adapter, so try a lower valued resistor. It may take a few experiments to find exactly the right value.
Also, be sure to use a resistor with a high enough power rating to dissipate the heat. The required power rating is given by the formula:
P = I x I x R / 1,000,000
where I is the current you are trying to achieve (in mA). For example, if an 8 Ohm resistor was the one that ended up giving 300mA above, it would have to be rated at 300 x 300 / 8 / 1,000,000 = 0.72 Watts. Since there is no such thing as a 0.72W resistor, any higher rating will do (such as 1W).
One last thing to check is that the charger doesn’t drain the battery when the timer turns it off. To do this, unplug the adapter from the wall, and check with an ammeter that no current flows from the battery to the adapter. I have not yet come across an adapter that has this problem (since they all use rectifier diodes to convert the AC to DC, and these let current flow only one way), but it could happen if, for example, there was some sort of regulation circuitry in the adapter.
Keeping LiPoly Packs Charged
There does not exist (to my knowledge) any sort of maintenance charger for batteries made of LiPoly cells. Fortunately, LiPoly cells also do not self-discharge nearly as fast as NiCd or NiMH cells. Thus, the only solution is to charge them once, top them up periodically, and top them up again before going flying if they’ve been sitting for more than a week, all using a proper LiPoly charger.
. The radio is plugged into a timer controlled charger too.")
My always-ready-to-fly hangar (or should that be "hanger"). The radio is plugged into a timer controlled charger too.
Radio Batteries
If your plane is equipped with a battery eliminator circuit (BEC), you will not have the problem of keeping a receiver battery charged. However, there is still the transmitter to worry about. Fortunately, you can use exactly the same technique used for keeping a NiCd or NiMH motor battery topped up: a slow charger and a plug-in timer. In this case, you can use the slow charger that came with the radio system.
[June 2007 Update: Sanyo has recently introduced their Eneloop AA NiMH cells, which have an extremely low self discharge rate. If you upgrade your transmitter pack to use these, it can sit on the shelf for months and still be ready to use. For more details, please see my review of these cells.]
In the Car
It is tempting to leave a plane in the car for those quick flights on the way home from work. If you do this, here are a few things to keep in mind.
It can get very hot in a car during the day in the summer. If your plane has a built-up structure, serious warps can develop, making the plane unpleasant or impossible to fly. Sheet balsa and foam construction is less prone to heat damage, although you will likely get wrinkles in the covering. Extreme heat can also damage your radio equipment.
Depending on where you park, theft is also a potential problem. Evaluate carefully if it’s wise to keep your shiny plane and possibly expensive radio gear where all can see it.
If you must keep your plane in the car, try to park in the shade. A front window reflective cover for the car, and a white sheet over the plane and radio can also help (both for shade, and hiding equipment from thieves).
Finally, make sure that everything is secured. You want your plane to fly at the field, not around the inside of your car when you make a sharp turn. Making sure everything is held in place will protect both you, and your plane and equipment.
![]()
![]()
![]()
![]()
![]()
![]()
![]()
![]()
![]()
![]()
Related Articles
If you've found this article useful, you may also be interested in:
- ARF Upgrades
- Conversion from Glow to Electric
- Scale Electric Airplane Design
- Model Airplane Electric Motor Mounting Methods
- Building and Installing Skis on Your R/C Plane
- Electric Aircraft Battery Mounting Methods

If you've found this article useful, consider leaving a donation in Stefan's memory to help support stefanv.com
Disclaimer: Although every effort has been made to ensure accuracy and reliability, the information on this web page is presented without warranty of any kind, and Stefan Vorkoetter assumes no liability for direct or consequential damages caused by its use. It is up to you, the reader, to determine the suitability of, and assume responsibility for, the use of this information. Links to Amazon.com merchandise are provided in association with Amazon.com. Links to eBay searches are provided in association with the eBay partner network.
Copyright: All materials on this web site, including the text, images, and mark-up, are Copyright © 2025 by Stefan Vorkoetter unless otherwise noted. All rights reserved. Unauthorized duplication prohibited. You may link to this site or pages within it, but you may not link directly to images on this site, and you may not copy any material from this site to another web site or other publication without express written permission. You may make copies for your own personal use.