Make a Dual-Boot IDE Cable
April 23, 2007

A simple hardware switch lets you choose between any two operating systems at boot time.
In early 2006, we replaced our two 500MHz P3 computers with 3GHz P4 machines running Windows XP Professional. The two old boxes, one of which ran Windows 98SE and the other Windows 2000, were relegated to testing new releases of MotoCalc to ensure continuing backward compatibility. They also served a few other purposes, such as providing space for real-time backups of important files, and operating our old but reliable HP ScanJet 4C.
More recently (early 2007), we decided to get rid of a lot of old “stuff”, and the P3 boxes came up for disposal consideration. Each of these boxes consumes about $50 worth of electricity a year, resulting in about a quarter of a ton of CO2 emissions from Ontario’s power plants.
After much discussion, it was decided that we still needed the ability to test MotoCalc on Windows 98 and 2000, but that other than that, we really only needed one of the two machines, and that it could be in a low-power standby mode most of the time. That’s when I came upon the idea of installing the primary hard disks from both boxes into one of them, with a front panel switch to choose which operating system (OS) to load.
How to Make it Work
I had a good idea of how I would do this, but decided to search the Web first to see if anyone else had done this. I found two how-to articles, but each had some shortcomings:
-
The solution presented in this video only works if the hard disks used automatically go into Cable-Select mode when no jumpers are present. It also requires a Cable-Select compatible IDE cable, which most aren’t, although it’s easy to make one.
-
DarkVision’s Ghetto Hard Drive Selector has a similar shortcoming, except this one only works with hard disks that automatically switch to Slave mode if the Master jumper is removed.
Clearly neither approach will work with all hard drives. In fact, the drives that work with one solution will not work with the other. If you have one of each kind of drive, or a drive that doesn’t exhibit either behaviour, none of the above will work.
The solution lies in using the drives’ Cable-Select mode. Virtually all IDE hard drives support this, either by setting a specific jumper or by removing all the jumpers (check your drives’ documentation). The two drives don’t even have to be the same in this respect.
In Cable-Select mode, the determination of which drive is the Master and which is the Slave is done by the IDE cable itself. Pin 28 of the IDE connector is the Cable-Select pin. If a drive is in Cable-Select mode, then:
-
If the Cable-Select pin is grounded, then that drive becomes the Master.
-
If the Cable-Select pin is left disconnected (open-circuit), then that drive becomes the Slave.
An ordinary IDE cable has the Cable-Select line connected all the way through, and since it is grounded at the host end, both drives see a grounded Cable-Select signal. If one were to cut the Cable-Select line between the first and second drive connectors, then only the first drive would see a grounded Cable-Select, thus becoming the Master. The second drive would become the Slave.
By cutting the Cable-Select line to both drives, and then using a switch to selectively reconnect it to one drive or the other, we can choose which drive is the Master and which is the Slave just by flipping the switch.
Making the Cable
To make the dual-boot cable, you’ll need the following:
-
An ordinary non-Cable-Select IDE cable with a host connector and two drive connectors.
-
A piece of 3-conductor cable (or 3 separate wires) about 12 inches long. A 3-wire slice off of a wider ribbon cable works fine for this.
-
A single-pole double-throw (SPDT) two-position (i.e. not center-off) toggle or other switch.
-
Some 3/32″ (2.5mm) diameter heat shrinkable tubing.
-
Some tools: hobby knife, wire strippers, soldering iron, solder, etc.
Prepare the IDE Cable
Notice that one edge of the IDE cable is red. This corresponds to pin 1 on the connectors, and is line 1 on the cable.

The completed cable. Click for a closer view with the parts labeled.
On both sides of the first drive connector (the center one), very carefully count your way over and find line 28 of the cable. Mark it with a fine point marker so you don’t lose track of it.
Using a sharp hobby knife, separate line 28 from the rest of the cable between the two drive connectors, and for about two inches (5cm) on the host side of the first drive connector. Between the host and first drive connector, cut the separated part of the line near the drive connector. Between the first and second drive connectors, cut the separated part approximately in the middle.
You should have three free wire ends sticking out of the drive cable now. Trim ¼” (6mm) of insulation off each free end and tin the wire with your soldering iron.
Prepare the Switch
Separate the three wires at both ends of your 3-conductor cable for a length of 2 inches (5cm), strip ¼” (6mm) of insulation off each end, and tin the ends. Also tin the contacts on the switch.

Insulate all connections with heat shrinkable tubing.
Slip ½” (12mm) lengths of heat shrink tubing over the 3 wires at one end and solder the wire ends to the switch contacts (center wire to the center contact). Slide the tubing over the connections and shrink it with a heat gun or by holding your soldering iron close.
Connect Them Together
Slip some heat shrink tubing over the other ends of the 3-conductor cable and prepare to solder these ends to the loose ends on the IDE cable. A block of wood with two clothespins is handy for holding the wires aligned for soldering.
Solder the center wire (green in the photo) of the 3-conductor cable to the loose end that is closest to the IDE cable’s host connector. Solder the other two wires (yellow and blue in the photo) to the remaining loose ends.
Slide the heat shrink tubing over the connections and shrink them. Your dual-boot cable is now complete!
Setting Up Your System
Set the jumpers on both hard drives to activate Cable-Select mode. How this is done varies from drive to drive. Consult your drives’ documentation. Often (such as on Fujitsu drives) this information is printed right on the drive’s label.
.")
The dual-boot cable connected to the hard-drives (the power connectors are unplugged for a clear view).
Connect the host connector of your dual-boot cable to the machine’s IDE controller (either on the motherboard, or on a separate IDE card). Connect the two drive connectors to the drives. Be sure that all the connections are oriented correctly (red side of the cable to pin 1 on the controller and each drive).
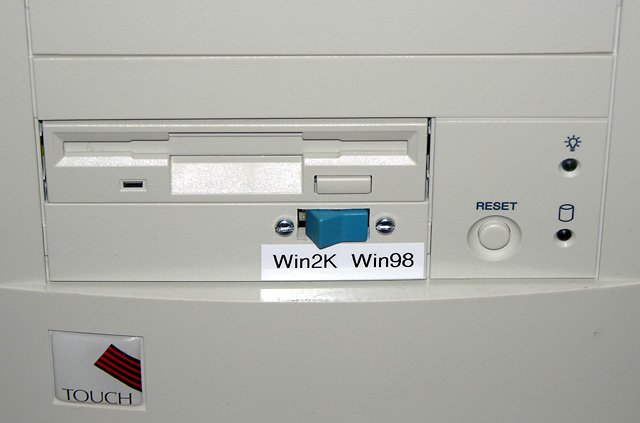
Install the switch on the front panel of your computer. The easiest place to do this is on one of the removable drive bay covers. Because I used a rocker switch instead of a toggle, I had a bit more work to do to make a rectangular hole. A toggle switch just needs a drilled hole.
Assuming both drives are already formatted and bootable, turning on the computer will cause it to boot from one of the drives. If you then shut down the computer, flip the switch (while the computer is off), and turn it back on, it should boot from the other drive.
If the currently running operating system is capable of reading the other operating system’s file system then the other drive will be visible as a secondary drive. On my computer for example, one drive boots Windows 98 using a FAT32 file system and the other boots Windows 2000 on NTFS. When Windows 2000 is running, it can read the contents of the Windows 98 drive (as drive D:). But when Windows 98 is running, it doesn’t see the Windows 2000 drive because Windows 98 doesn’t know about NTFS.
If either of your drives doesn’t currently contain a bootable OS, just start the machine with that drive selected as the primary drive (via the switch) and install an OS on it as you would on a single-drive machine. Just be careful not to let the installer format the second drive for you as well.
Switching Operating Systems
To switch from one operating system to the other, you first have to shut down the one that is running, all the way to the point where the computer is powered off. Once the computer is off, flip the switch and then turn the computer back on.
That’s all there is to it. This technique can be used for any two operating systems, including those that don’t support dual booting. There’s no need to mess with special boot loaders and no trouble with OSes that can’t co-exist easily. Whichever OS is currently running thinks that its hard drive is the primary drive.
![]()
![]()
![]()
![]()
![]()
![]()
![]()
![]()
![]()
![]()
Related Articles
If you've found this article useful, you may also be interested in:
- MusicRack – A Digital Sheet Music Display System
- A Compact Home-Made Raspberry Pi Tablet
- USB Powered AA NiMH and NiCd Battery Charger

If you've found this article useful, consider leaving a donation in Stefan's memory to help support stefanv.com
Disclaimer: Although every effort has been made to ensure accuracy and reliability, the information on this web page is presented without warranty of any kind, and Stefan Vorkoetter assumes no liability for direct or consequential damages caused by its use. It is up to you, the reader, to determine the suitability of, and assume responsibility for, the use of this information. Links to Amazon.com merchandise are provided in association with Amazon.com. Links to eBay searches are provided in association with the eBay partner network.
Copyright: All materials on this web site, including the text, images, and mark-up, are Copyright © 2026 by Stefan Vorkoetter unless otherwise noted. All rights reserved. Unauthorized duplication prohibited. You may link to this site or pages within it, but you may not link directly to images on this site, and you may not copy any material from this site to another web site or other publication without express written permission. You may make copies for your own personal use.
Necromnicon
October 17, 2007
Pretty cool. Becomes a hassle to have to power off your machine to change operating systems though.
houdini65
November 22, 2007
Nice little modification. It will be perfect for one PC I modified with an IDE/power connector on the front of the case with flip down support brackets, so I can easily switch drives without opening the case.
Hayss
February 11, 2008
It would have been easier with a Boot Loader.
Mad Scientist
April 24, 2008
I have to agree with the last post a boot loader such as GNU GRUB (one of the most popular boot loaders used on most Linux installations) would be a much better option and would allow you to select the OS at boot time. Note it selects the OS not the HDD so you can have as many different OSs as you have space for. e.g. 98, 2000, XP, Vista, and Linux
http://www.gnu.org/software/grub/
Stefan Vorkoetter
April 25, 2008
Maybe a boot loader would have been easier when starting from scratch, but I already had the two hard drives (from identical machines with different OSes), so this was easier. Besides, building this little bit of hardware is easier than installing software.
rafael
August 28, 2008
I have 2 different types of hdd on a single pc like you and 2 different OS, xp and vista. My solution was I use 2 ide cables since pc’s have 2 built-in ide connectors both hdd config primary. I installed the OS one a time while the other hdd is not connected and remove the other one to install the next OS. I use the ESC key during boot to select the OS I want on what drive. No switches no boot loader.
Brian Robinson
November 29, 2008
I was just wondering if one could put 2 dpdt switches in the power lines to the hdds thus the one hdd would be powered down and would not be able to boot. I am looking at 2 completely separate systems.also there would be no chance of a major corruption.
Stefan Vorkoetter
November 30, 2008
Brian, I don’t think that would work. Having a powered-down device on a live bus (which IDE is) would probably either prevent the bus from working, or damage the output circuits in the powered-down device (or both).
jo
December 01, 2008
I think it would be better (power consumption was the issue wasnt it?) to make a switch for the power supply to each of the hdd, but thats just my opinion. I did this for my pc so I could run linux and xp
Brad Gilbert
March 10, 2009
If you switch off the power connection instead, then you could make up an IDE cable with many connectors. this would allow more than two drives.
Scott Ferguson
March 14, 2009
Good solution for when you have more than three or so drives, but by simply modifying the boot.ini file in your main OS (any Windows system) you can easily choose what you want to boot into.
Good to know about the cable select issues, but sort of overkill for this application.
Terry Sid
April 14, 2009
Why don’t you use HDD Caddy. I have been using since (Not Sure time span… 1992) early 486DX times. I used to swapp caddies (five of them). Two for my genuin work, and rest of them for the testing sw/hw…… but you have to replace them often, because connectins go bad after some time… easy solution! Hard one but good one is buy an IDE switch(arround $190 to $300).
Cody
April 26, 2009
I use Ghost from a floppy MsDos boot disk to backup my master drive to a slave drive, then disconnect the slave drive from the IDE cable and power cable until next time I backup. I disconnect the slave to ensure the safety of my backup, but would prefer to use a switch and not have to disconnect the plugs. Would this setup (or a minor modification) help me to do that? Thanks!
Stefan Vorkoetter
April 27, 2009
Cody, the problem with this setup in this article is that the drive is still connected to the computer, both via the IDE cable, and the power cable. A problem such as a power supply surge could still damage the non-selected drive. However, the drive is safe from being written to (e.g. by a virus or otherwise misbehaving application.
itsonlyme666evil
August 11, 2009
Why use hardware if software can do this for you ? I’m using the bios for this on my p4 motherboard with 2 connected harddisks 1 is ATA and the other SATA but that makes no difference, use up to 6 bootable harddisks if you want to. To set it up (this you only have to do ones) : Enter your (AMI)bios settings by pressing F2 (or DEL) at powerup. On the BOOT page : BOOT DEVICE PRIORITY -> 1st BOOT DEVICE select HARDDISK, 2nd select DISABLED. HARD DISK DRIVES -> 1st HARDDISK (name of harddisk to boot), 2nd select DISABLED. REMOVABLE DRIVES -> DISABLED. CD/DVD DRIVES -> DISABLED. Now the bios is setup for use, so SAVE and EXIT. Now every time you want to change the booting harddisk : Enter the bios setup and go to the BOOT page, go to HARD DISK DRIVES and change 1st to the harddisk which you want to use (leave 2nd to DISABLED). Now save and exit to boot the selected harddisk.
Dan
March 21, 2010
I know this is an old article, but its what I need, have 2 drives, will use this technique to hold a home business on one drive boot to keep a clean boot, and my personal boot both xp home, but gives me access to both hard drive spaces. On an older 1999 1ghz motherboard will allow me to use the machine, without the need to hop into bios. Would rather keep the os on different drives, but still be able to access data from the other. Thanks
Haritakis Constantinos
September 29, 2010
Very good idea and very simple to do !
Ralf Weber
May 03, 2011
What speaks against using cables which are cable select? They also present the advantage to be ATA66 or ATA100 whereas the non cableselecting ones are only ATA33.
Stefan Vorkoetter
May 04, 2011
Ralf, the reason one needs non-cable-select cables is because the cable needs to have the cable select line in it so that we have something to switch.
Duffy
March 16, 2013
Having built the “Ghetto Hard Drive Selector” with disappointing on an off results I decided to look for an alternate approach and so found your article. An interesting design that I suspect is a reliable foolproof approach.
As a result I began to give a rebuild with your design serious consideration.
However, there at the bottom of page one of your article was a brief comment suggesting that the “Ghetto Selector only works with disks that automatically switch to Slave mode with the jumper removed”.
Since I had nothing to loose I gathered together a couple of Seagate drives that satisfied the automatic Slave mode criteria and popped them into my “Ghetto Selector”. Sure enough it works, with no problems, as you suggested it would.
So it is that I just have to send along a brief “Thank You” for your insightful comment and bringing a happy ending to a long standing disappointment.
Duffy
More suggestions
March 21, 2013
Superb post however , I was wanting to know if you could write
a litte more on this topic? I’d be very grateful if you could elaborate a little bit more. Cheers!
Duffy
March 22, 2013
In response to “More Suggestions” 03-21-2013
I’m not a techy wiz so I’m not quite sure how much help I can offer.
However I stand ready to share any details from my experience that may be useful.
Here then the two enlightening events that seem to have made it all work after a simple copy cat build of Mr. Reed’s* original design. *(believe a Mr. Reed was the author of the original “Ghetto Drive Selector” article.)
1. As a participant in a Computer Users Group I have access to the surplus hard drives of some of the Members. Using various pin selections and cable plug arraignments I accidentally found a set-up that worked. Overwhelmed by this success I thought I understood the necessary details and returned the drives without noting the drive specifications or pin selections.
A capital sin for any octogenarian. So it was that I found myself back at ground zero for no combination worked when I went to use any of the drives that I own.
The first hopeful event occurred when I came upon Mr. Vorkoetter’s comment about the required drive specification.
2.The second key event occurred after a careful rereading of the article wherein it specified that before switching drives you must turn the power off. Apparently simply logging off is not a sufficient condition to enable switching drives.
All is working well now and I must say I find a drive selector a real convenience. As a tinkerer it ensures I will always have immediate access to an operating system no matter the mistakes I make when introducing a change or exploring a software package.
If you have a specific question I will give it my best.
Duffy
Westwood
December 29, 2015
This switchable cable method doesn’t work with Western Digital Drives. Bummer!