A Tale of Two Whiz Wheels: E6-B versus CR Wind Solutions
August 25, 2006

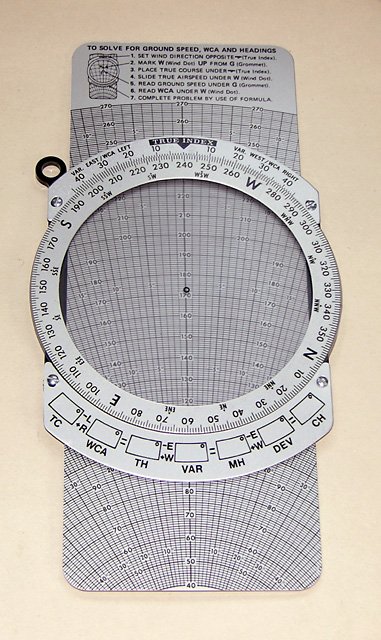
Calculator side of the Aero Products Research E6-B9 flight computer.
Solving the wind triangle is the only non-trivial math needed by the private pilot. Unlike weight-and-balance or speed-time-distance calculations which are just simple arithmetic, the wind triangle requires trigonometry. At least it would require trigonometry if you didn’t use some sort of flight computer, either electronic or one of the traditional “whiz-wheels”.
When I first began my flight training, we were all required to purchase an E6-B style flight computer. This has a circular slide rule for speed-time-distance and density altitude calculations on one side, and a graphical wind triangle solution on the other side. This style of computer is manufactured by several companies, including Aero Products Research and Jeppesen.
The wind solution involves a rotating compass ring with a transparent screen and a sliding plate imprinted with diverging lines that intersect a series of concentric arcs. One literally “draws” the wind triangle on the computer and reads off the solution.

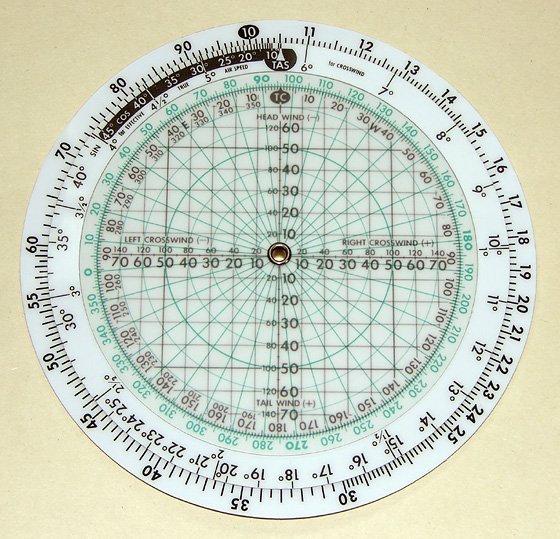
Calculator side of the Jeppesen CR-3 flight computer.
After graduating with Private Pilot License in hand, I soon discovered there was a different type of non-electronic flight computer available, the Jeppesen CR-3 (and its smaller cousins, the CR-2 and CR-5). The front side of the CR-3 is similar to that of the E6-B, albeit with quite a few additional features not normally used by the private pilot, such as pressure pattern navigation and Mach number.
Like the E6-B, the reverse side of the CR-3 is used to solve wind triangles, but in a very different way. Jeppesen’s design, dating from 1955, provides a wind solution that doesn’t require any sliding parts. It takes about the same number of steps, but they are quite different than those performed on the E6-B.
The rest of this article compares the wind triangle solutions of these two flight computers. To the best of my knowledge, these are the only two non-electronic solutions used in aviation.

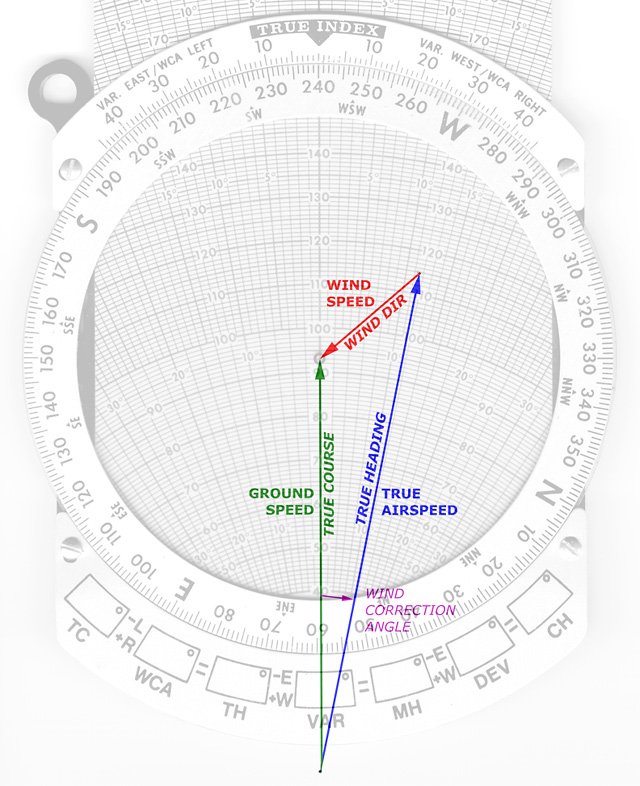
The components of the wind triangle. Ground speed and true heading are what we need to find.
The Wind Triangle
To compare the E6-B and CR computers, we first need a clear understanding of the problem they are designed to solve.
When flying from one point to another, we first determine the direction of the second point relative to the first with a chart and navigation protractor. This is our desired true course. If there were no wind, we could then point the airplane in that direction and fly straight there. Unfortunately, there’s usually a wind, and it’s usually coming from one side or the other, meaning that it will blow us off course. To adjust for this, we point the airplane in a different direction (our heading) and let the wind blow us on course.
Usually, some component of the wind also acts in a direction parallel to our line of flight, either slowing down (a headwind) or speeding up (a tailwind) our progress over the ground. This in turn affects the time it will take to get where we’re going, and thus also the amount of fuel needed.
Given the speed and direction of the wind (from forecasts), our desired course, and our true airspeed (from the airplane’s flight manual), the wind triangle solution tells us the necessary heading to use, and what our groundspeed will be.
This can be solved mathematically using the trigonometry we learned in high school. Modern electronic flight computers do exactly that behind the scenes. But the older “whiz wheel” type of flight computers can solve it almost as easily, and at the same time provide you with a picture of what’s going on.
A Sample Problem
I’ll use the following example problem to show how each type of flight computer is used to solve it:
- True course to our destination: 240°
- True airspeed from flight manual: 115kt
- Forecast wind at our altitude: 290° at 30kt.
The wind triangle drawing above right is actually drawn to scale for this particular sample problem.
The wind arrow is 30 kt long, pointing into the centre from a heading of 290°
The E6-B Solution
I’ll show the E6-B solution first, because it illustrates more of the entire wind triangle than the CR solution.
The first step is to plot the wind arrow on the screen of the E6-B. First rotate the bezel so that the wind direction (290°) appears under the “True Index” mark. Then move the slide until the “grommet” in the centre is over any convenient arc (I usually use one of the 5 knot increments, e.g. 145, 155, etc.). Draw the wind arrow starting 30kt further up the slider, pointing into the grommet (click on the picture for a better view). At this point you’re half way to the answer.

Rotate the bezel to 240° and move the slider until the arrow tail is on the 115kt arc.
Next, rotate the bezel so the desired true course (240°) appears under the “True Index” mark. Then slide the slider until the tail of the arrow is on the arc corresponding to the true airspeed.
At this point, we have our answers. The wind correction angle is given by the radial line where the tail of the arrow is. In our example, it’s half way between the 11° and 12° lines, so our wind correction (crab) angle is 11.5°. The arrow tail is on our right, so our wind correction will be to the right, meaning we have to add the 11.5° to our desired 240° course, giving a 251.5° heading (this is a true heading, so don’t forget to correct for magnetic variation before setting off).
The arc appearing within the grommet gives our ground speed. In this example, it’s 93kt, meaning we’ve lost 22kt due to the combined effect of the headwind component of the 30kt wind and our crab angle. Using this ground speed and the distance, we can compute the flying time and fuel needed.
Although I’m mathematically inclined, the operation of the E6-B seemed a bit magical to me at first, until I realized that it literally helps you “draw” the wind triangle to scale and then take measurements from it. After looking at this illustration for a while, it becomes quite obvious.
 components.")
Select the true course, draw the wind arrow, and determine crosswind and headwind (or tailwind) components.
The Jeppesen CR Solution
When I first saw a Jeppesen CR-3 flight computer, I was intrigued by the fact that it could do a wind solution with no slide. The solution requires about the same amount of work as using the E6-B, but the steps are different.
The first step is to rotate the translucent wheel so the desired true course (240°, in green) is over the “TC” marker. Now find the green radial line corresponding to the wind direction (290°) and locate where it intersects with the green circle corresponding to the wind speed (30kt). Draw the wind arrow or just place a dot at the tail of the arrow. You can now read off the crosswind and headwind (or tailwind) components directly using the grid lines on the fixed background. In our example, the crosswind is about 23kt, and the headwind is about 19kt.

Select the true airspeed, and find the wind correction angle next to the crosswind component on the outer disk.
Next, rotate the outer disk so that the true airspeed (115kt) appears over the “TAS” marker. Now find the crosswind (as determined previously) on the outer disk, and read off the wind correction angle. Here the 23 on the outer disk is half way between 11° and 12° on the inner disk, so our wind correction (crab) angle is 11.5°. Since we have a right crosswind, the correction is to the right so we add it to our 240° course, giving a 251.5° heading. Not surprisingly, this is the same answer that the E6-B gives (again, this is a true heading; you’ll still need to adjust for magnetic variation).
The last step is to compute ground speed. Unfortunately, it’s not as simple as subtracting the headwind component from (or adding a tailwind component to) the airspeed. In addition to the loss of speed caused by the headwind, there is an additional small loss caused by the fact that you’re not pointed the same direction you are going. So, an additional “crab” correction is necessary.

Find the wind correction angle on the black scale to find the "effective true airspeed".
To perform this correction, locate the wind correction angle on the small black scale to the left of the “TAS” marker. The value on the outer disk corresponding to this is the “effective true airspeed”, which is the component of your true airspeed that is in the direction you want to go. In this example, it’s just a bit less than 113kt. (If your wind correction angle is less than about 5°, you can skip this additional step, as the loss due to the crab angle is negligible.)
Now you can subtract the headwind from (or add a tailwind to) the effective true airpseed to get ground speed. In our example, we have 113kt – 19kt, giving 94kt.
Notice that this is one knot higher than the E6-B solution. The discrepancy is due to inaccuracy in making pencil marks and measurements, combined with accumulated rounding error. The magnitude of this type of error is far less than, for instance, the accuracy of the pilot in flying a precise heading or airspeed, or the accuracy with which the weather conforms to the forecast. A calculation error of 1% or so is insignificant. (Just for the record, the exact answer to five significant figures is 93.397kt, so both 93kt and 94kt are about equally close to “correct”.)
Which Computer is Better?
Once you’re comfortable with both types of flight computer, either one gets the job done equally well. The E6-B computer is a little easier to remember how to operate (especially since most models have instructions printed on one end of the slide). On the other hand, the CR computer can be operated with one hand after drawing the wind dot, which is handy when recomputing headings mid-flight.
A drawback to most E6-B computers is their size. A typical model is 10″ long and 5″ wide. The CR-3 on the other hand is just a 6″ circle, while the pocket sized CR-5 is just over 4″. Being one piece, there’s also no danger of the slider falling out in the midst of an in-flight calculation.
My personal preference has shifted towards the CR. After working with it for a while, its operation makes as much sense as the E6-B. The small size of the CR-5 lets me keep it in my jacket pocket, so it’s always there when I need it. The calculator side is also handy for computing tips, or comparing unit prices of items in the grocery store.
![]()
![]()
![]()
![]()
![]()
![]()
![]()
![]()
![]()
![]()
Related Articles
If you've found this article useful, you may also be interested in:

If you've found this article useful, consider leaving a donation in Stefan's memory to help support stefanv.com
Disclaimer: Although every effort has been made to ensure accuracy and reliability, the information on this web page is presented without warranty of any kind, and Stefan Vorkoetter assumes no liability for direct or consequential damages caused by its use. It is up to you, the reader, to determine the suitability of, and assume responsibility for, the use of this information. Links to Amazon.com merchandise are provided in association with Amazon.com. Links to eBay searches are provided in association with the eBay partner network.
Copyright: All materials on this web site, including the text, images, and mark-up, are Copyright © 2026 by Stefan Vorkoetter unless otherwise noted. All rights reserved. Unauthorized duplication prohibited. You may link to this site or pages within it, but you may not link directly to images on this site, and you may not copy any material from this site to another web site or other publication without express written permission. You may make copies for your own personal use.
Paul Heim
November 19, 2007
Since the CR-3 calculates effective true airspeed does that make it more accurate than the traditional E-6B? Thanks.
Stefan Vorkoetter
November 19, 2007
Paul, the E6B will give you exactly the same answer for the final ground speed. Graphically, the curved speed arcs on the slide of the E6B take care of accounting for "effective true airspeed".
Jim Maher
December 04, 2007
Thanks for the detailed desc. Been a longtime since I used my CR-3; your article helped jumpstart the gray matter upstairs.
Dave Howard
March 16, 2008
I prefer the CR-3 to the E6-B. It is more handy, which means it is more likely to be used, and can solve all aviation math problems (except weight and balance) faster than any electronic calculator out there, even then, it’s close.
I used to think the FAA was a bunch of stodgy old coots for not allowing the use of electronic calculators (even though I preferred the E6-B anyway) on check rides, until I realized that they are trying to get you to use a better, more reliable tool!
The CR-3 I have does more conversions than either my Dalton or Jeppesen E6-Bs and makes graphic x-wind solutions a breeze. Plus is makes my student jealous that I have a convenient computer. I got suckered into buying one of those E6-B watches that has proven absolutely useless – its simply too small.
Most of my students are from the electronic calculator generation and are wizzes at anything mathematical, but are continuously amazed at how many problems the CR-3 can solve and in less time than their fancy graphing calculators. Make sure you don’t throw away the little instruction book that comes with the computer!
I encourage my students to fasten their E6-B into their trifold kneeboard with the calculator side up for in-flight use it makes the course correction and time/speed/distance/fuel solutions a snap.
Terry
June 12, 2008
More of a question: while studying for IFR, came across problem for which the only correct answer required changing the wind direction from true to Magnetic by subtracting the MAG-VAR before performing the wind-triangle calc. I have never seen this done before — FAA question error? or just something everyone assumes we all know to do?
Stefan Vorkoetter
June 12, 2008
Terry, converting the winds from true to magnetic before calculating will work, but then you have to convert your desired track from true to magnetic before calculating too. In short, the flight computers will work with true directions or magnetic directions, as long as you use only one or the other consistently.
I don’t know much about IFR, but if you are trying to determine the wind correction to fly a particular magnetic track (e.g. outbound on a radial), then it makes sense to convert the winds to magnetic before calculating.
Peter B
January 16, 2009
The US Navy and US Marine Corps use the CR-3 and CR-5 models exclusively for primary and advanced training in jets and helicopters. It is a better tool with more uses, allows one hand manipulation, and promotes a better understanding of fundamental concepts.
Durand Branch
June 05, 2009
I didn’t know the CR-3 could do wind calculations on the reverse side. Everyone talks about the E-6b but the CR-3 gets little publicity. Because of your article, I’m going to buy one.
Lynn Parker
June 14, 2009
I have a E6-3B computer from aero products so was surprised to see yours is 10" long. Mine is 5.75×4.25". It seems to be the same as your longer one with the snap on calculator on the back.
Steve Ottaviano
September 16, 2009
I "grew up" on the CR5 in the 70’s, and melted my first one on the glare shield. I still have my second, though I haven’t used it in this PDA/Garmin world for years and years (have always had it in my flight bag, though). I’m getting ready for a Pacific ferry, and wanted a backup that didn’t rely on batteries — and can you believe it, I had forgotten how to do wind corrections with it. Thanks for your good write-up. It made a good review for me.
Alex
October 22, 2009
This is a great comparison. Very helpful. Thanks!
Eddie Mabillard
November 14, 2009
There is a German made Whiz Wheel too, the Aristo aviat 617. Now it is made by someone called Pooley.
Sandy
January 20, 2010
Is there any monetary value to either of these wind-easy computers. Either the E6B or the CR?
Just curious. Thanks.
Stefan Vorkoetter
January 20, 2010
Do you mean as a collector’s item? Not really, since both are still being manufactured and are readily available at any pilot shop.
Henry
April 07, 2010
Hi Stefan, I was recently shown how to do a reverse windspeed calculation on an E6B, i.e. how to calculate the wind speed and direction based on the airplane’s true course, heading, and groundspeed. I was unable to figure out how to do the same thing on a CR… can you help? thanks, henry
Stefan Vorkoetter
April 07, 2010
I’ll have to look it up in the CR manual, having never tried the reverse calculation on either (although the E6B is fairly obvious to figure out).
Bart Casey
January 02, 2011
excellent review of the CR-3, takes me back to my training in the military. We used the clunky E6-B which the CDN military bought soon after the Wright brother’s maiden flight….the CR-3 is much more convenient. Thanks again.
Massimo Spataro
January 27, 2011
Easy and fast, and not require battery for run .
André Ranulfo
February 07, 2011
You helped a lot — TKS!
Kimutai Ruto
February 17, 2011
Cool stuff…remind me of PPL Ground School
Jay
April 02, 2011
Stefan, Thank you for the explanation . . . I was having trouble doing these calculations using the included manual. Your explanations and the highlights proved invaluable.
Timothy Ryan
May 04, 2011
I have an old CR-1 computer. How does this compare with the others described above? Thanks. Tim
Jessica Lima
May 22, 2011
stil confused about the wind triangle
helped a bit.
Aswin Nair
August 06, 2011
thanks
Gary Williams
August 17, 2011
lost my instructions this helped me thank you…defo for planning at home…ever tried doing these calcs why trying to fly a helicopter?
Stefan Vorkoetter
August 22, 2011
Gary, the only time I’ve ever actually used a flight computer while flying (an airplane, not a chopper) was during my flight training. I find that for the kinds of calculations one needs to do in-flight, mental arithmetic is faster and just as accurate.
Shriraj Kanhere
September 16, 2011
Well after all the advantages of CR over E6B, you cant work other way around on CR. You can calculate track if heading and winds are known on E6B, while CR doesn’t support this reverse calculation!. Like that it matters, how often we calculate other way around anyways?
Stefan Vorkoetter
September 19, 2011
Shiraj, of course you can use the CR computer to do the reverse calculation. See page 44 of http://www.mypilotstore.com/mypilotstore/ProductDocs/crinstructions.pdf to read how. It’s true that you wouldn’t do that very often, but what you might do is calculate the winds if heading, airspeed, track, and ground-speed are known, which both the E6B and CR computers can also do.
Claes M Johansson
November 04, 2011
I think you are overlooking the existence of the Aristo Whizz-wheels that came(?) in two versions: with a traditional sliding plate, but also in a round only variant which exploits the pure trigonometric solution of the sinus theorem. Not quicker but very elegant. Can provide photo another time.
Bryan Baxter
February 06, 2014
He Stefan.Any chance you doing this as a video?New student in my 70s.Always need to see things.Video worth a million pics.Thanks Bryan.
Earl R. Benedict
February 27, 2014
Been flying for the last 60 years both civ. and mil. and have used both the E6B and the CR computers , still use them to keep in practise
Evan Nadeau
July 22, 2014
Here is the manual from the Jeppesen website for the CR computers
http://www.jeppesen.com/download/misc/crinstructions.pdf
Michael Fox
November 05, 2014
I have used both and teach both. My most recent discovery with the cr6 is the ability to do sin, cos and tan calculations which are used for stall speed in a bank calculations. Once you know how to do the calculations it is way faster than anyone on an electronic calculator.
Mark Montague
January 13, 2015
I, too, originally learned on the E-6B, but years later discovered the CR series. What a lovely little instrument! Years ago Jeppesen used to publish a workbook that not only taught the standard problems and their solutions, but also showed how to use the wind side of the CR to calculate great circle headings and distances between two points identified solely by thier lat/longs. This method works with surprising accuracy on legs up to several hundred miles in length, and I used to astound my copilots on those Pacific crossings. Armed with only the company flight plan and a CR, you could safely complete an oceanic crossing with only minor accumulated error.
It is also possible to use the CR, when flying a westward flight, to calculate the groundspeed necessary to “freeze” a sunset for as long as you want. Flip it over the the calculator side and determine what glide ratio you’ll need to reach a given point at a given altitude–or to figure the actual glide ratio being made good. Not bad for a couple of little round pieces of plastic!
Dr Alan Blackwood
August 02, 2015
As a long-time user and collector of whizz-wheels I was greatly interested by your article and I wondered if you might like to read my reflections upon the various flight computers I regularly use.
Jeppesen CR – when I fly I always have a CR-2 in my jacket pocket and a CR-3 in my flight bag. I do not usually use a CR to solve wind triangle problems but I keep myself in practice in case the need arises. The CR is probably the best whizz-wheel to use when it becomes plain that the forecast air temperature is wildly inaccurate and you wish to recalculate TAS using a reading from the OAT probe. The temperature correction is never likely to exceed 2.5 degrees (C) for a PPL but we want to be as accurate as is possible and the CR computer allows for this. I recently purchased an ASA copy of the CR-3 – the ASA-E6B-CIRC – and, amazingly, it appears to be of superior materials and construction when compared to the Jeppesen original.
Aviat 617 (formerly by Aristo of Germany, now by Pooleys of England) – this is simply the Rolls-Royce of whizz-wheels. The smoothness of the movement of the disc and cursor on the calculator side make it a joy to use – even one-handed. The wind side has a fixed wind-arm eliminating the need to mark the wind on the disc in pencil. The smoothness of the movements of the wind azimuth ring, the wind-arm and the slide allowed me one-handedly to solve the problem posed in the article in 10 seconds. I use the Aviat 617 for all my pre-flight planning and I have it in my flight case when I fly. The ARC-2 with wind-arm (by AFE) is my back-up whizz-wheel – it is just as smooth as the Aviat but is plainly of somewhat flimsier construction.
Pooleys CRP-9 (formerly Airtour CRP-9) – this is another pocket whizz-wheel I like to keep in my jacket. Its calculator side has all the features of the best ‘professional’ flight computers except that it lacks a cursor. Interestingly, the wind side of this computer offers a third non-electronic method of solving wind triangle problems – however, its use of ratios (which must be calculated) and iterations make the method cumbersome and time-consuming – needless-to-say, I keep in practice just in case!
ASA CX 1a – I never use this electronic machine for real flight planning, I do not carry it with me when I fly and have not felt inclined to purchase its successor. These machines are ingenious and perhaps a useful back-up on the ground, but I just can’t see myself trawling through its menu while flying an aeroplane.
Apart form that one afternoon back in 1989 when I learned to use my first whizz-wheel (Airtour/Pooleys CRP-1 – ubiquitous in the UK – I still have mine), I have often wondered why we bother with slide flight computers not fitted with a wind-arm. It might well be easier to learn the techniques by drawing them out, but once the learning stage is passed the computer can be used much more quickly if it is fitted with a wind-arm. Perhaps the answer for student pilots should have been a removable wind-arm, but neither the USA nor UK makers seem to offer such a machine.
h.a.c.van asten
September 06, 2015
When flying a crab angle course , is it necessary to deflect the rudder to keep course against the wind coming in from starboard , or can the rudder be kept in the neutral position ?
Stefan Vorkoetter
September 06, 2015
Once you have established the crab angle, using ailerons and rudder as appropriate, everything is returned to neutral. As far as the plane is concerned, it is flying straight and level through the air in the direction it is pointed. It just happens to be moving over the ground in a different direction because the air itself is moving relative to the ground.
Gary LaPook
November 28, 2015
You state that the CR computer and the E-6B were the only non-electronic solutions to the wind correction problem. There is another, even better and more accurate, solution and one that does not require using a pencil to draw a wind dot and can be done with just one hand. This other method uses trig but in a very simple way and is used on the U.S. Air Force MB-2A, Mb-9, and on the TELEX PT computers and on Soviet flight computers. The problem with the CR method is that you have to estimate the cross-wind and head-wind components from that very small scale diagram on the back of the CR and if you are off by just one knot you end up with a big error. Try this example, true course 240°; true wind, 270° at 30 knots; TAS 110 knots. The correct answer is ground speed of 83 knots and the WCA of 8°. When you draw the wind dot on the CR if you estimate the cross-wind is 16 knots then you get the correct 8° WCA but if you read it as 17 knots then you find the incorrect WCA of 9°. The other method actually uses trig and you can see how it works by using that method with your CR since the CR has the requisite scales. Subtract the TC from the wind direction and you find the “relative wind angle” (RWA) of 30°. Now line up the 30 degree (on the white sin scale) mark on the CR with the TAS of 110 knots on the outside scale. Next look at the wind speed on the outside scale, 30 K, and read out the WCA on the white sin scale of 7.8° Since you have a headwind, subtract this 7.8° from the RWA of 30°, 22.2° and opposite this 22.2° read out the ground speed on the outside scale, 83 knots. The MB-2A and the other computers have a better arranged sin scale but the principle is the same as the example I just gave you but even easier to do on those other computers.
Here is a link to a picture of the MB-2A:
http://fer3.com/arc/img/105440.imgp4723.jpg
gl
Gary LaPook
November 28, 2015
Here is a link to a better picture of the Air Force computer, this time to the MB-9
http://www.rekeninstrumenten.nl/pages%20and%20pictures/12071.jpg
gl
Gary LaPook
November 28, 2015
Here are additional links to the MB-2A and to the Felsenthal (TELEX) PT and to the Soviet type computers:
http://sliderulemuseum.com/Manuals/AF_Type_MB-2A_AirNavigationComputer_Instructions.pdf
http://www.usmilitariaforum.com/forums/index.php?/topic/148132-air-force-mb-2a-computer-air-navigation/
http://www.ebay.com/itm/like/391328392338
Here is the
Soviet flight computer using the same method:
http://sliderulemuseum.com/Military/S531_Soviet_Aviation.jpg
The Felsenthal PT-3
http://sliderulemuseum.com/Circular/Felsenthal_PT-3_Aviation_1970_BobDenny.jpg
gl
Gary LaPook
November 29, 2015
In fact, you can do the same computation on any of your slide rules by using the sine scale positioned against the “D” scale. Line up the RWA on the sine scale against the TAS on the D scale. Then read out the WCA on the sine scale against the wind speed on the D scale. Then add the WCA to the RWA if a tail wind, or subtract if a head wind, and read out the ground speed on the D scale opposite the total of the RWA and WCA on the sine scale.
gl
Stefan Vorkoetter
January 24, 2016
Gary, the one thing that the method you describe does not seem to do is account for the reduction in effective groundspeed (groundspeed towards the destination) caused by the WCA. Effective GS is your actual GS, multiplied by the cosine of the WCA. For small wind correction angles, the reduction is relatively insignificant (e.g. about 1% for an 8 degree WCA), but for larger angles (slow plane in high cross winds) it makes quite a difference. For example, a 20 degree WCA results in a 6% reduction in effective GS.
Gary LaPook
January 25, 2016
Those other computers that utilize the law of sines are the most accurate way to do the calculation, The CR comes up with the effective ground speed as a “cludge” but is not necessary on the E-6B and not necessary using the exact method using the trig solution with the law of sines. You can do this on a calculator to 10 digits of precision if you knew your airspeed and wind speed to that level of precision. The law of sines solution is exact, no approximations, no estimation of cross-wind and head-wind component from a small grid on the CR.
Sin a/ A =sin b/B =sin c/C = K a constant
Using the example that I posted,
” Try this example, true course 240°; true wind, 270° at 30 knots; TAS 110 knots. The correct answer is ground speed of 83 knots and the WCA of 8°. When you draw the wind dot on the CR if you estimate the cross-wind is 16 knots then you get the correct 8° WCA but if you read it as 17 knots then you find the incorrect WCA of 9°. The other method actually uses trig and you can see how it works by using that method with your CR since the CR has the requisite scales. Subtract the TC from the wind direction and you find the “relative wind angle” (RWA) of 30°. Now line up the 30 degree (on the white sin scale) mark on the CR with the TAS of 110 knots on the outside scale. Next look at the wind speed on the outside scale, 30 K, and read out the WCA on the white sin scale of 7.8° Since you have a headwind, subtract this 7.8° from the RWA of 30°, 22.2° and opposite this 22.2° read out the ground speed on the outside scale, 83 knots.”
Do this on a calculator.
a is relative wind angle (RWA) 30 degrees and A is the TAS 110 K
b is the WCA and B is the wind speed
C is the ground speed.
sin a /A
Sin 30 /110 = 0.500000000/110 = 0.004545455 this is a constant used later, call it “K”
So sin b /B also must equal K
So sin b = KB
So b = arcsin KB
then multiply this “K” by the wind speed, 30 X 0.004545455 = 0.136363636
So b, the WCA, = arc sin(0.136363636)
arc sin (0.136363636) = 7.837479763 degrees which is the most accurate possible wind correction angle (if the wind speed were known to 10 digit, the TAS to 10 digits and the wind direction to 1/1000000000 of a degree.)
Angle c is the WCA combined with the RWA subtracting WCA when there is a head wind and adding it when it is a tailwind.
sin c/C must also equal K
Solving for C the groundspeed.
sin c/ C = K
sin c =KC
C =sin c/K
Then subtract the WCA from the RWA
30.00000000000 – 7.837479763 = 22.16252024 = c
C =sin c/K
sin (22.16252024) / 0.004545455 = 82.99171148 knots ground speed.
Since we never know our TAS or wind speed or course or wind direction very accurately then the CR, the E=6B and the and MB-2A and the TELEX PT are as accurate as they can be given the precision of the input data. But, given the additional inaccuracy introduced by estimating the cross wind component and the head wind component form the grid of the CR, the CR has the potential to have the largest error compared to the other methods. In fact, if using the CR, you would be better off ignoring that grid and using the trig method that I demonstrated using the existing sine scale that is on the CR.
gl
Stefan Vorkoetter
January 25, 2016
Okay, I see now what you mean. In fact, that is the formulation I used when I wrote a program for my HP-41C to do the wind calculations. However, I don’t think the CR’s effective GS calculation is a kludge. I’ll have to do it again to be sure, but I recall that I did the math, and after applying some trig identities, the two solutions are the same. But I agree that the largest source of error in the CR is the initial cross-wind and head-wind determination, which would drown out any other potential sources of error.
Erwin Eijsermans
March 30, 2019
Hi,
Thanks for this interesting atricle, big fan of the CR series myself.
Do you, or anyone else reading this, have any experience with (or documentation on) the Batori Flight Computer?
Trying to figure out how to calculate the Groundspeed based on wind.
Regards,
Erwin
Michael Balandin
June 12, 2019
Hi!
You wrote an excellent comparison of E6 vs CR, but you’re wrong stating that there are only two non-electronic computers for wind calculations. 🙂 There are at least three devices widely (being) used in Soviet/Russian aviation with different approaches, two of them are still in use. NL-10 is a special-purpose slide rule which explicitly uses the law of sines, NRK-2 works similarly to CR but operates with percents instead of actual velocities and therefore works without sliding, and there’s a very old fashioned device named “vetrochet” that still works.
Stefan Vorkoetter
June 13, 2019
Thanks for that additional information. Now I need to try to track these down. 🙂
Laney Mill
January 03, 2020
One advantage of the non-electronic calculators is also that they are much easier to work when the flight is bouncy and much easier to work when the flight is so bouncy it’s hard to make your finges hit the correct button on the tiny electronic calculator keys.
Erwin Eijsermans
August 17, 2020
Hi,
I have been looking at Gary LaPook’s comments and alternate method for using the CR2/3/5. It is quite fascinating, but limited on the CR series.
He refers to the MB2/9, both have a windscale up to 90 degrees, whereas the CR only goes up to 45.
The method is completely clear and I use it on the MB-9, but what to do if the RWA is more then 45 degrees, or if the RWA+TW is more then 45 degrees. In these cases I get stuck on the CR series. Am I missing something here?
Regards,
Erwin
P.S. found a manual for the Batori Navigational computers (they are stunning pieces of kit)
Erwin Eijsermans
September 11, 2020
Disregard last question
Biggles B
November 09, 2020
Hi Stefan, excellent article.
When comparing the advantages of each computer, you wrote, “the CR computer can be operated with one hand after drawing the wind dot, which is handy when recomputing headings mid-flight.”
Is this not also the case with the E6-B?
Cheers!
Scott
June 06, 2021
Despite having grown up in the digital age, I have always had a fascination with analog computers. So when I started flying I was planning on buying an E6-B; after reading your article I decided to try the CR-3 instead and have loved it.
Michael Do
January 03, 2022
Cool. It’s amazing how a solution like that can be achieved with less mechanical complexity. But. There is absolutely no way that the same amount of work is required for both methods. Reading the CR instructions made my head spin. Mental math, sparse markings, and having to go through at least 2 successive readings before accessing the stored information. Good thing I don’t fly aircraft–then again, maybe it’s all fun and games up there if one is expected to have the spare clock speed for all those hoops. Jokes aside, I wonder about the alternate reality where Dalton’s computer didn’t use a slider.
Ben
December 11, 2023
Hi! Thanks, this was very clear.
BTW, apart from the manual, do you have any other material on the trick questions with the CR-3? E.g.
Solving Wind Direction and Velocity (given HDG, TAS, TRK, GS)
Solve TRK, WCA (given W/V, HDG, WCA)