Handheld GPS Glareshield (or Dashboard) Mount with Power Supply
May 21, 2006

Garmin eTrex Legend GPS in its mount, on the glareshield of a Cessna 172N.
My first two GPSes were both Garmin eTrex models. One was the original yellow eTrex, and the second was the eTrex Legend which has more memory, and most importantly, mapping capability. Neither of these is an aviation GPS, but both can be useful in the VFR cockpit. Cockpit GPS, by John Bell, provides an excellent overview of using GPS, including non-aviation units, as a navigation aid.
With the appropriate add-on Garmin MapSource product, the the Legend is also quite useful in the car, showing you where you are, although it doesn’t provide auto-routing or driving directions.
Two Problems…
There are two problems with using many handheld GPSes in the cockpit:
- It’s difficult to mount the GPS so it can “see” the sky and that you can see the screen.
- Battery life is extremely short in cold weather.
A battery has two primary attributes: voltage and capacity.
Voltage depends on the number and type of cells in the battery. Alkaline batteries have a nominal voltage of 1.5V per cell. NiCd and NiMH are 1.2V per cell.
Capacity is a measure of the current in milliAmperes (mA) that the battery can deliver, multiplied by the amount of time in hours (h) for which it can do so. For example, AA sized NiMH cells available as I write this have a capacity of 2400mAh, meaning they can deliver 2400mA for 1 hour, 1200mA for 2 hours, 800mA for 3 hours, etc.
Cold weather affects capacity somewhat, but its effect on voltage is the main problem. To understand this, we need to look at a battery discharge graph.
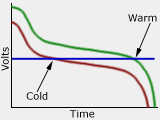
The green line shows a typical voltage (under load) versus state-of-charge graph for a NiMH battery. Notice that the voltage drops rapidly at first, then stays fairly level for a long time (about 1.2 down to 1.1V per cell), and then drops off rapidly at the end.
The red line shows the same discharge curve, but in colder conditions. The capacity remains about the same, but the voltage is lower.
The blue line is the problem. This is the voltage at which the device using the battery stops working. At room temperature, the battery reaches this voltage when it is almost depleted. In colder conditions, this voltage is reached when there’s still plenty of capacity left.
Several commercial mounts are available for the Garmin eTrex series, such as those made by RAM Mounts. However, I found these a bit on the expensive side, considering that I bought the eTrex instead of an aviation GPS to save money.
Many handheld GPSes like the eTrex use two AA alkaline, nickel cadmium (NiCd), or nickel metal-hydride (NiMH) cells. Depending on the model and use of the backlight, these can power the units for 4 to 20 hours. In cold weather though, the apparent battery capacity (see the sidebar) is significantly reduced. I often found my eTrex switching itself off after only half an hour to an hour of flying, since Cessna’s heaters aren’t very effective.
…One Solution
I designed a mount for my GPS that attaches to the aircraft’s glareshield and includes its own power supply to keep the GPS battery topped up. Since some of the planes I rent do not have a 12V or 28V power socket available, this mount is completely self contained.
The idea is simple. By using a four-cell 4.8V battery, there will be enough voltage to provide the 2.4V that the GPS needs even when the weather is cold and that four-cell battery drops to 4V. A voltage regulator in the mount produces a steady 2.8V as long as the four-cell battery remains above about 3.5V. This 2.8V is connected directly to the two-cell battery in the GPS,
How it Works
Here’s a schematic diagram of the GPS mount’s circuitry, along with an explanation of how the circuit works:

GPS mount power supply schematic.
Diode D1 together with R1 forms a 0.6V voltage reference which is applied to the inverting input of Z1, one half of an LM358 op-amp. The non-inverting input monitors a fraction (2.7/12.7 = 21%) of the voltage appearing at the collector of power transistor Q1. Z1 amplifies the difference, and uses that to control the current through the transistor. If the output wanders above about 2.8V, then the op-amp output goes more positive, which reduces the flow of current, reducing the voltage appearing at the output.
The result is a regulated 2.8V output that is connected to the battery terminals of the GPS (with two NiMH cells installed). This voltage is within the operating range of the GPS, and is low enough that the current flowing into the cells when the GPS is off won’t damage them.
When the cells in the GPS are fully charged, they will exceed 2.8V for a short while. The regulator circuit will only supply power if it needs to. If the GPS battery is above 2.8V, no current will flow from (or into) the regulator. In effect, this regulator is only half a regulator: it can pull a low voltage up, but it can’t pull a high voltage down.
Because of this lack of full regulation, never operate the GPS in the mount without NiMH cells installed in the GPS!. You could damage it.

The charger with the in-line constant current regulators.
Charging
Both the eTrex and the mount contain 2300mAh NiMH cells, two in the GPS and four in the mount. I constructed a wall charger using a single 12VDC 1000mA “wall wart” power supply and two constant-current circuits.

Charger schematic.
The two circuits share a common negative lead (CHARGE-), and the two positive leads are separate (CHARGE1 and CHARGE2). A 3-pin Deans plug on the charger plugs into the corresponding jack in the GPS mount and charges both batteries at the same time when the mount’s switch is in the OFF/CHG position.

Power supply Veroboard component layout diagram.
Building the Circuit
I didn’t bother to design and etch circuit boards for this project. Instead I just used Veroboard® which has pre-etched parallel copper strips that can be cut where needed. Similar boards of various brands are available at almost any electronics supplier.

Charger Veroboard component layout diagram.
The construction diagrams show the board from above, with an “x-ray” view showing the copper traces and where they are to be removed. The points labelled “R”, “Y”, and and “B” are connection points for red, yellow, and black wires respectively.
The switch and charging jack are not on the circuit board. They are connected to it by short lengths of fine wire. I used heat-shrinkable tubing over the connections to avoid the possibility of short circuits.
Testing
Once the circuit is completed, connect a 20 Ohm 1 Watt resistor to the 2.8V output terminals and a fully charged 4.8V NiMH battery pack to the input terminals. Turn the circuit on, and verify that you have about 2.8V appearing across the 20 Ohm resistor.

The holder is an open tapered box, with contacts on the back, and felt padding on the side.
The GPS Mount
The mount itself is made from 1/16″ (1.5mm) and 1/8″ (3mm) birch aircraft plywood, held together with cyanoacrylate model airplane glue (such as Hot Stuff or Zap). There are three parts to it: the GPS holder, the power supply box, and a means to hold it in the airplane.
I don’t have drawings for any these, since I just built them to suit as I went along, so please refer to the photos and the dimensions in the text if you want to build one just like mine. If you have a different GPS, like one of the new, slightly larger, color eTrex models, you’ll have to modify the holder’s dimensions.
The GPS holder is a tapered box with an open top and a cut-out front to let the screen show through. I screwed two short brass bolts into rear face from inside the box, and soldered thin brass contact springs onto these. These connect to the slightly modified GPS (see below). Some felt pads on the sides of the box hold the eTrex snuggly in place.
The outside dimensions of holder are 2.4″ wide at the top, 2.1″ at the bottom, 2.6″ high, and 1.5″ deep (61mm/53mm x 66mm x 38mm). The opening in the front was cut 0.4″ (10mm) from each edge. The holder is made of 1/8″ (3mm) material.
, circuit board (left), and switch and charging jack (right).")
The power supply box holds the battery (top), circuit board (left), and switch and charging jack (right).
The power supply box is installed on the rear of the holder. A slot in the box gives access to the tips of the brass bolts, to which the power supply output wires are connected. The four-cell NiMH battery fills the top half of the box, with the circuit board, switch, and charging jack in the bottom. A thin piece of plastic keeps them apart, and a lid held on by screws holds everything in place.
The dimensions of the power supply box are 2.4″ wide, 2.9″ high, and 0.75″ deep (61mm x 74mm x 19mm). It is made of 1/16″ (1.5mm) material.

In this "exploded" view, one can see the slot in the box that gives access to the GPS contact bolts.
The holder and power supply are both finished with a coat of primer, followed by a coat of satin black paint.
The Cessnas I rent (1978 to 1980 vintage 152 and 172N models) have stiff padding on the forward edge of the glareshield. This padding is held down with screws at regular intervals, but it is possible to slip a piece of thin material under the padding between these screws. So, to hold the GPS mount in place, I installed a strip of wood the height of the padding (0.6″ or 15mm) near the back of the holder (which faces the front of the airplane). I then screwed a piece of 1/32″ (0.8mm) fiberglass printed circuit board material to this to slip under the padding. A bit of self-adhesive foam at the back tilts the mount slightly toward the pilot, and provides some friction so it doesn’t slide out on its own.
For other aircraft, you may need to devise a different mounting system. On planes with a thin glareshield edge, you may be able to use an office clamp or clothes pin with the design shown here.

Two wire contacts installed on the eTrex battery cover connect the power supply to the internal battery.
Modifying the eTrex
The last problem to solve is how to connect the power supply output to the battery in the GPS. The GPS’ own external power contacts won’t do the job, since they’re designed to accept a higher voltage.
Warning: This will void your GPS warranty. Proceed with caution!
For the eTrex, two contacts have to be installed on the back of the battery cover. I made these from 20 gauge solid wire and connected them to the battery terminals with thin 24 gauge stranded wire. The contacts are recessed below the ridges on the battery cover so that setting the eTrex down on a metal surface won’t cause a short circuit. The brass spring contacts in the GPS mount are narrow enough to fit between these ridges.

I soldered to the waterproof terminals, but suggest soldering to the battery contacts instead.
Note: I connected the wire contacts to the terminals where the Garmin’s battery contacts pass through the plastic case from the battery compartment to the inside of the unit, but I don’t recommend this. Soldering to these softened the plastic and I had to hold them in place until they cooled. This probably compromised the water resistance of my GPS. Instead, I’d suggest soldering to the tops of the battery contacts themselves.

The Garmin eTrex Legend installed in the completed GPS mount. The switch and charging jack are visible.
Using the Mount
To use the GPS mount, I just drop the eTrex into it, turn on the switches, and slip it under the glareshield padding. This puts it where I can see it and it can “see” the sky, and provides power for even the longest flights.
Be sure to put it far enough from the compass that it doesn’t interfere with it. Also make sure that it doesn’t interfere with your view. I put it slightly off to one side. When flying in a Cessna 152, I usually put it way over on the passenger side, angled towards me.
As an experiment, I left the GPS and mount turned on in my car in the winter with temperatures around -20°C, and it ran for about 25 hours.
On a round-trip flight from Waterloo (CYKF) to Sault Ste. Marie (CYAM) in the summer of 2003, the eTrex battery level indicator still showed a full charge after being turned on for the entire day.
![]()
![]()
![]()
![]()
![]()
![]()
![]()
![]()
![]()
![]()

If you've found this article useful, consider leaving a donation in Stefan's memory to help support stefanv.com
Disclaimer: Although every effort has been made to ensure accuracy and reliability, the information on this web page is presented without warranty of any kind, and Stefan Vorkoetter assumes no liability for direct or consequential damages caused by its use. It is up to you, the reader, to determine the suitability of, and assume responsibility for, the use of this information. Links to Amazon.com merchandise are provided in association with Amazon.com. Links to eBay searches are provided in association with the eBay partner network.
Copyright: All materials on this web site, including the text, images, and mark-up, are Copyright © 2026 by Stefan Vorkoetter unless otherwise noted. All rights reserved. Unauthorized duplication prohibited. You may link to this site or pages within it, but you may not link directly to images on this site, and you may not copy any material from this site to another web site or other publication without express written permission. You may make copies for your own personal use.