Build a Low Cost Thermal Peak Detection NiCd Charger
January 23, 1997
The electric model aircraft and car industries have produced a bewildering array of field chargers for NiCd motor battery packs. These range from simple 6 or 7 cell chargers consisting of a resistor and mechanical timer, to more complex chargers with peak detection, cycling, and the ability to handle 36 cell packs. The resistor/timer type of charger is cheap, but it is has two drawbacks: it might not fully charge the pack in the allotted time, or it might overcharge the pack. The more complex chargers have none of these drawbacks, but they are very expensive.
The charger described in this article can charge packs of 4 to 7 cells with capacities ranging from 600mAh to 2Ah. The charger automatically begins charging when a pack is connected. It charges at a (nearly) constant current (adjustable), and terminates the charge when the pack begins to get warm (a NiCd pack begins to warm up when it has reached full charge). An LED indicates that charging is in progress.
The Circuit
The circuit for the charger (Figure 1) is simple. Z1A is a comparator which compares the voltage on its two inputs and produces a high output when the "+" input (pin 5) is higher than the "-" input (pin 6), and a low output otherwise. R1 and R2 form a voltage divider, presenting a fixed voltage (about 7V) to pin 5. A pair of thermistors (TR1 between the PAK+ and TEMP terminals, and TR2 between the TEMP and GND terminals; see Figure 2) form another voltage divider which presents a voltage to pin 6. This voltage is proportional to the temperature difference between TR1 and TR2. When TR1 is within 10°C of TR2, this voltage is below 7V, and the output of Z1A turns on Q1. This causes current to flow through Q2, R5, and R4, turning Q2 on. This in turn causes Q3 to conduct, resulting in current flow through the NiCd pack connected between the PAK+ and PAK- terminals. The amount of current flowing through Q3 (and thus the pack) is determined by the current flowing through Q2, which in turn is determined by the setting of R5. The current can range from about 2A to 5A. While Q1 is on, current will also flow through LED1 and R6, thus illuminating LED1 to indicate that charging is in progress.

Figure 1. Charger schematic.
As the temperature of TR1 rises, the voltage at pin 6 rises. When the temperature of TR1 exceeds that of TR2 by 10°C or more, pin 6 will exceed 7V, and Z1A will turn off Q1, Q2, and Q3, terminating the charge. Z1B performs the same comparison as Z1A, but it’s output is used to provide hysteresis (the current flowing into the base of Q1 pulls Z1A’s output too low for it to perform this function). When Z1B goes low, current flows through R7, lowering the voltage at pin 5 to about 1.4V. This ensures that the charger will not switch back on as the pack cools off (unless it cools to about 50°C below ambient). The only way to restart the charge is to disconnect the pack being charged. This will disconnect TR1, causing pin 6 to go to 0V, which will turn the charger back on. Since there is now no pack connected, no current will flow through Q3, even though the CHARGE LED is lit. When a pack with a sufficiently cool TR1 is plugged in, charging will recommence.
TR1 and TR2 are identical thermistors. Their resistance is 10kΩ at 25°C, and the resistance increases or decreases by about 4% for each 1°C fall or rise in temperature (the actual rate of decrease and increase varies with temperature). TR2 is installed in the charging cable near the charging plug to measure ambient temperature. TR1 is installed in the battery pack to measure pack temperature. By using two thermistors, the charger will shut off based on the temperature rise instead of the absolute temperature (otherwise the pack will be overcharged on a cold day or undercharged on a hot day).
Connectors and Cables
When I first built this charger, I used 4-pin computer power supply connectors for charging my packs. My packs were all wired permanently into my planes, so this connector does not need to handle the motor current. Even if you connect your packs to your planes with connectors (eg. Sermos), each pack could have a separate charge connector, thus reducing wear and tear on the more critical power connectors. I use the connector with the male housing (and female pins) in the plane, and the female/male connector on the charger. Computer power supply splitter cables are a good source of these connectors. I use the red and yellow leads for the battery + and – connections, and the two black leads for the thermistor (TR1).
Figure 2 illustrates how the cable, connectors, and battery pack should be wired.

Figure 2. Cable schematic.
Note that the order of the wires on the left side of Figure 2 does not correspond to the order of the outputs on the right side of Figure 1. Refer to the output and wire names when making up the cable! The PAK+ and PAK- conductors should be 18ga or 16ga, since they must handle up to 5A. The GND and TEMP conductors can be thinner since they handle less than 3mA.
For the 12V+ and 12V- inputs to the charger, use a two conductor 18ga or 16ga cable terminated with large clips suitable for connection to a car battery. Lamp cord is good for this.
As the diagram implies, I had a separate thermistor in each of my packs. Later, I moved away from having a charge connector on each pack, and I made a single charge connector that plugged onto the end of my charger cable. This connector had a pair of Sermos connectors for charging, and a short lead with the thermistor on it for temperature sensing. This required that I install a normally-open START push-button between the TEMP and GND terminals, since the charger will not reset automatically with TR1 permanently connected. To charge using this method, you have to remember to insert the temperature probe into the pack.
Construction
The circuit is designed to be installed in a Radio Shack® project case (see Figure 5 and parts list). Any suitably sized enclosure with a metal lid (or an all-metal enclosure) will do. R5 is glued to the component side of the board, with short lengths of wire connecting it to the appropriate pads. The lid of the case is drilled for R5 and LED1. The potentiometer is then installed in the appropriate hole, and this holds the board in place inside the case.
Here is the printed circuit pattern for the charger:

Figure 3. Copper side. Actual size is 1.9" x 1.6"
The following diagram illustrates component placement on the board:

Figure 4. Component side.
Solder short lengths of wire to the appropriate terminals of R5. Glue R5 to the board, ensuring that R5’s shaft is in line with the holes for LED1, and solder the leads. Install LED1, paying attention to polarity. The negative lead (usually indicated by a dot, flat spot, or shorter lead on the LED) is furthest from R5. The LED should be installed so it is high enough above the board to protrude through the corresponding hole that you’ll make for it in the case.
Transistor Q2 should be laid flat on the board. A piece of aluminum channel, about 1.5" long and the width of Q2 should be placed on the copper side of the board, extending past the end of the board. Hold Q2, the board, and the aluminum channel together with an appropriate sized bolt. Ensure that the channel does not short circuit any traces.
Install the remaining components, ensuring that none of them stick up high enough to interfere with the case once the board is installed. Transistor Q1 should have it’s rounded side facing R3. I suggest you use a socket for Z1, because it is easily damaged by soldering, and hard to remove if it is damaged. Install the socket, with pin 1 at the top left corner.
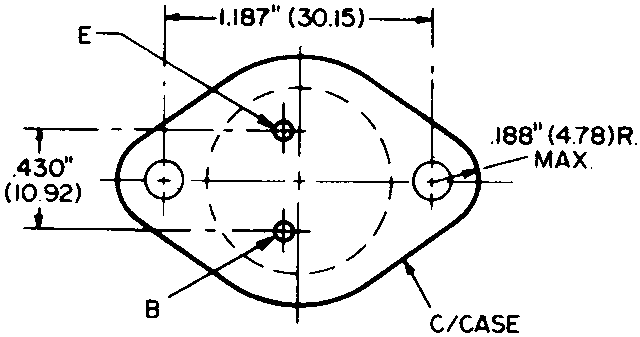
Transistor Q3 should be installed on a hefty heatsink on the outside of the case and connected to the rest of the circuit with wires. The emitter of Q3 connects to the point marked E and the base to the point marked B. If the leads are not marked on your transistor, refer to the bottom-view diagram at right for the pin-out (click on the diagram to enlarge it if your browser doesn’t show it clearly). Use 16ga or 18ga wire for the emitter-to-E connection.
Connect the charging cable to the circuit. Connect the PAK+, TEMP, and GND leads as marked on the board. Connect the PAK- lead to the collector of Q1 (the case). Connect the supply leads to the circuit at the points marked 12V+ (red) and 12V- (black).
Install everything in the case. Figure 5 shows how the front panel will look. The circuit board occupies the left half of the case. The heat sink for Q3 is installed on the right half of the front panel. The heat sink for Q2 extends past the circuit board, underneath the top-right quarter of the case. LED1 protrudes through a vinyl grommet, providing more contrast.

Figure 5. Panel layout.
Testing and Calibration
Connect the power leads to a 12V source (eg. a car battery). The LED should light immediately. Connect a 50kΩ potentiometer between the PAK+ and TEMP leads, with the resistor set at the half way point. The LED should stay lit. Slowly decrease the resistance. When the resistance reaches approximately 10K (assuming 20°C room temperature), the LED should go out. The LED should stay off even as you increase the resistance again. Temporarily disconnecting and reconnecting the potentiometer should cause the LED to light once again.
To calibrate the charging current, use an ammeter in line with the PAK+ lead (an extra pair of 4-pin connectors is handy for this). Monitor the current when charging a depleted pack (the current will reduce towards the end of the charge, especially when charging 7 cell packs). Note the settings of R5 required for different currents and mark them on the case if you wish.
When using the charger for the first time, monitor it carefully. Feel the pack from time to time (don’t touch the thermistor though or your body heat will terminate the charge). The pack should barely start to warm up before charging stops.
Parts List
The following table lists all the parts needed. Radio Shack® part numbers are provided for those parts available there. The thermistors used in the prototype are from Radio Shack, although almost any thermistor with a 3% to 5% resistance drop per 1°C temperature rise will do.
| Part | Description | Radio Shack® |
|---|---|---|
| R1 | 33kΩ ¼W | 271-1341 |
| R2 | 47kΩ ¼W | 271-1342 |
| R3, R4 | 10kΩ ¼W | 271-1335 |
| R5 | 50kΩ small potentiometer* | NA |
| R6 | 470Ω ¼W | 271-1317 |
| R7 | 4.7kΩ ¼W | 271-1330 |
| C1 | 0.1µF 50V | 272-1069 |
| LED1 | High-brightness LED | 276-87 |
| Q1 | 2N3904, 2N2222, or equiv. | 276-2009 |
| Q2 | TIP42, MJEF34, or equiv. | 276-2027 |
| Q3 | 2N3055 or equiv. | 276-2041 |
| Z1 | LM393 dual comparator | NA |
| TR1, TR2 | Thermistor | 271-110 |
| Miscellaneous | 4" x 2 1/8" x 1 5/8" case* | 270-231 |
| 2" x 2" TO-3 heat sink* | NA | |
| knob to fit R5 | 274-403 | |
| vinyl grommet to fit LED | 64-3025 |
*Notes: If you cannot obtain an appropriately sized potentiometer, Radio Shack 271-1716 will do, but you’ll need a larger case. You can also use a 1MΩ potentiometer, which will provide a wider current range (about 1A to 5A). If you cannot find an appropriate heat sink, you can get away without it if you use an all-metal case such as Radio Shack 270-239.
Parts not available at Radio Shack can be ordered from electronic supply houses such as Sayal Electronics or Digikey.
Addendum
After using the charger for some time, I’ve found that the TIP42 PNP transistor (Q2) gets rather hot. This can result in thermal runaway, wherein the transistor refuses to switch off. There are two possible solutions: One is to mount the transistor on a proper heat sink, external to the case (and insulated from the case). The other solution is to install a 47Ω or 50Ω 10W resistor in the connection between Q2 and Q3. This will reduce the power dissipated by the transistor to about 0.5W (with the physically much larger resistor dissipating the remainder). The resistor can be mounted on the front panel, with the leads going into the enclosure through notches filed in the sides of the panel (insulate the leads with some heatshrink tubing so they don’t short against the panel). I’ve used the latter approach, and Q2 now barely gets warm.
![]()
![]()
![]()
![]()
![]()
![]()
![]()
![]()
![]()
![]()
Related Articles
If you've found this article useful, you may also be interested in:
- BattMan II: Computer Controlled Battery Manager
- USB Powered AA NiMH and NiCd Battery Charger
- High Speed NiCd Charger for Electric R/C
- LED Bargraph Optical Tachometer
- On/Off Motor Controller with Brake
- Analog Bar Graph Expanded Scale Voltmeter
- Versatile Miniature High-Rate ESC with BEC and Brake
- Miniature High-Rate Speed Control with Battery Eliminator Circuit (BEC)
- Miniature High-Rate Speed Control with Brake
- Getting the Most from Your Radio Control System

If you've found this article useful, consider leaving a donation in Stefan's memory to help support stefanv.com
Disclaimer: Although every effort has been made to ensure accuracy and reliability, the information on this web page is presented without warranty of any kind, and Stefan Vorkoetter assumes no liability for direct or consequential damages caused by its use. It is up to you, the reader, to determine the suitability of, and assume responsibility for, the use of this information. Links to Amazon.com merchandise are provided in association with Amazon.com. Links to eBay searches are provided in association with the eBay partner network.
Copyright: All materials on this web site, including the text, images, and mark-up, are Copyright © 2026 by Stefan Vorkoetter unless otherwise noted. All rights reserved. Unauthorized duplication prohibited. You may link to this site or pages within it, but you may not link directly to images on this site, and you may not copy any material from this site to another web site or other publication without express written permission. You may make copies for your own personal use.
Mad Scientist
April 24, 2008
Can this be used with a wall outlet and an adapter say 12v 600mAh( the output of a trickle charger for a motorcycle battery )?
Stefan Vorkoetter
April 25, 2008
No, it needs 12V at about 5A to operate properly. If you can find a power supply that puts out a steady 12 to 14V at 5A or more, then that will work.
Kelvin Chidakwa
March 10, 2011
Hey… my mind is getting to realise where my dream will be REAL. Great works man thumbs up..!
OEMIE
March 22, 2013
It’s a nice way to bulid a NiCd charger.
georgi
January 20, 2014
hey thanks a lot
would it be possible to power this with a 12v 2.5 a adapter?
Peter Colliard
June 23, 2018
I am not a electrical engineer but I have basic knowledge of electrical components. I have old Ni Cd packs from old photo cameras than I want to a charge. the original charger does not work, there for the need for the charger.
1) 5 battery AA NicD serial connected (5 bat x 1.5 v = 7.50 volts)
2) 8 battery N size NicD serial connected (8 bat x 1.2 v = 9.60 volts)
Can this circuit work for both requirements ? and do I need the the temperature sensor ? and hoe to connect to the corresponding Batteries ?
Stefan Vorkoetter
June 23, 2018
Peter, I’m afraid this circuit isn’t suitable for charging either of your batteries. It is designed to charge high capacity low-internal resistance NiCds that used to be used for electric powered model planes, cars, and boats. Note that it is also extremely unlikely that any old NiCds you have will still hold a charge. They have probably degraded beyond usefulness.
Peter Colliard
June 23, 2018
Stefan: thanks for the quick response …. I got some new NiCd batteries therefore the original question, but I could change all of them to NiMh could this help ? My problem is not batteries it is the charger !!!
I was thinking hacking a commercial charger, but I am not sure is a single cell, for a single slot would work for a serial “connect pack” of batteries
Stefan Vorkoetter
June 24, 2018
The problem isn’t NiCd vs. NiMH. The charger in this is designed to fast-charge (20-30 minutes) high capacity SubC batteries. AA and N cells just can’t take that.
Peter Colliard
June 24, 2018
Stefan: thank you very much for all the trouble… finally could suggest a charger that could solve my problems ? of course no liability, it would be entirely my responsibility !!!!
Stefan Vorkoetter
June 26, 2018
I’m afraid I don’t know of any off-the-shelf chargers that will work for your specific applications. You would have to find one for each case that is rated for the right number of cells and a suitable charging current. Do you recall if the original chargers were “smart”, or just simple overnight chargers that you had to remember to disconnect after 10-15 hours or so?
Peter Colliard
June 26, 2018
Stefan. again thanks for the time… the chargers are “smart” quick-charge from 2-4 hours aprox.for Ni-Cd , maybe RC chargers ??? of course changing to Ni-Mh batteries
Stefan Vorkoetter
June 27, 2018
A NiMH-capable peak-detecting RC charger that can charge at a low enough rate (e.g. around 500mA for the AA and 150mA for the N) would do the trick. NiMH has fallen out of favour in RC though, so I’m not sure if NiMH chargers are still easily available, and I’m also not sure which of them can handle such a low charge rate.
jose
March 19, 2020
Hello Stefan, I am Jose and I like very much your site!!! I am a begginer in electric flight and your page is full of useful information. I have a question, Can i use this charger for ni mh batteries? i have a traxxas 6 cell 1800mah pack, and just like you i would like to build one by myself but just because i can’t afford a universal one such imax b6.
i wait for your answer. thank you
Jose
Stefan Vorkoetter
March 20, 2020
Hi Jose, welcome to this great hobby! The charger was designed for NiCd, but it can be used for NiMH as long as you keep the charge rate fairly low (no more than about 2.5A for your 1800mAh pack, which will take about 45 minutes). This is because NiMH actually warms up a little bit while charging, whereas NiCd cools down while charging and then gets warm when it’s full. If you charge NiMH at too high a rate, then it will warm up too much while charging, and the charger will think that it has finished. Also be sure to keep everything in the shade while charging.
Jose
September 27, 2020
Hello Stefan! i would like to build this charger and power it with a 12v-14v transformer up to 2Amps. What kind of modifications should i do to use with with my desired power source? i would build this charger to charge ni mh motor batteries and ni cd tx and rx battery packs at about 1C (2Amps and 1amp respectively) and if possible to charge at 0.5C or even lower charge rates.